Friday, December 31, 2010

Comfort Mashed Potatoes

I have a confession to make.  Here goes... I LOVE MASHED POTATOES!  Ok, now that I have that off of my chest I have another confession.  The most depressing part of my Christmas in Minnesota was that there was no mashed potatoes at the big familypalooza.  It felt so wrong.  I had been expecting to eat my weight in potatoes that night.  This is the first year that this sin has been committed, so the next time I take part in this mass family gathering I will be taking care of the potatoes, assuming that no one else has spoken for them.  Anyway, back to my baked potato obsession. 

When I was a kid mashed potatoes were my favorite thing ever.  To be specific, I liked them as a dipping sauce if you will for baby dill pickles.  Gross?  Maybe.  Instant mashed potatoes were probably the first thing that I learned how to master.  I could eat a whole bowl of mashed potatoes smothered in butter for dinner, and in fact that is what I am doing right now (gravy instead of butter though).  I'm posting this recipe not because it is mind-blowing or original (but it's pretty healthy considering the other recipes that are out there), but mainly so that I have a record of it for myself for when I'm craving it in the future.  Which will be all of the time.  No joke.  Poor Al, he doesn't like mashed potatoes.  Hehe.  Rating 7/10.

Ingredients
  • 4 russet potatoes- peeled and chopped into about 4 chunks (cut them widthwise not lengthwise, so that the slices are circles, not wedges)
  • 3/4 tsp salt
  • 2 tbsp room temperature butter
  • 1/2 cup hot milk (I used skim)
  • pepper to taste
Peel and slice potatoes.  Place them in a large pot with enough water to cover them completely.
Put in 1/4 tsp of the salt and bring the potatoes to a boil.
Once the water is boiling bring the temperature down to medium, cover the pot, and simmer for 15 minutes (or until the potatoes are soft enough to be pierce by a fork).
Drain the potatoes and take this time to microwave the milk.
I used a hand blender to mash the potatoes, but use any method (NOT THE FOOD PROCESSOR) that you like to mash the taters.  Mix in the butter, remaining 1/2 tsp salt, and pepper to taste.

CranApplesauce

I decided that having my wisdom teeth removed was the perfect incentive to make my own applesauce.  I finally got around to it today since I am awfully tired of eating processed food.  I also threw in some cranberries that have been sitting idle in my freezer for the past two months.  However, in the end I was kind of disappointed.  The good news is that this cranapplesauce is absolutely amazing.  The bad news is that I definitely forgot just how prevalent cranberry seeds are.  The thing about getting your wisdom teeth removed is that you can't let anything get lodged back in the holes, or else you could get an infection or develop a dry socket.  Yikes!  I ended up licking around the seeds on the ladle that I was using, num num!  I'm freezing the rest for a happier time in my life when I don't have huge holes preventing me from eating/cooking delicious things.  In the meantime I'll be living on Special K french vanilla protein shakes, which are pretty good but full of nasty ingredients. Rating 7/10.

Update- wisdom teeth holes have finally closed.  I thawed out the applesauce, and instantly devoured it.  Rating boosted to 8/10!


2 cups of cranberries- frozen or fresh
10 apples (a combo of apple varieties is best)- skinned and sliced
1 lemon- juiced
1/8 cup of brown sugar (or more to taste)
1 1/2 tbsp turbinado sugar (or more to taste)
1/2 tsp cinnamon (I used Tung Hing from China- nom nom)
water

Measure out the cranberries and place them in a 4 qt or larger pot or dutch oven.
Cover the cranberries with enough water so that they are completely submerged.
Boil the cranberries for 10 minutes.  I used this time to prepare my apples.
Combine the apples, lemon juice, brown sugar, turbinado sugar, and cinnamon in with the cranberries.
Stir the ingredients together and cook on medium for about 15 minutes- or until the apples have softened.
Mash with a potato masher, blend in a stand mixer, or process (depending on how you like your applesauce).

Tuesday, December 21, 2010

Chicken Masala

I went to Costco earlier this week and ended up buying a HUMONGOUS pack of spinach.  I hate wasting food, so I've been trying to figure out discreet ways of sneaking it into meals.  I actually made this meal tonight solely for the purpose of using spinach.  It was a nice simple dish, and the spinach tasted great in it. Rating 6/10.
(I went semi-veggie and didn't eat any of meat since I used some really fatty thighs- yuck)
Recipe from lolfoodie
  • 2 tbs cooking oil- I used vegetable and coconut
  • 1 pound chicken- cut into one inch cubes
  • 3 tbs garam masala, divided
  • 1/4c all-purpose flour
  • 1 medium onion, diced
  • 2 cloves garlic- minced, or 2 tsp pre-minced garlic
  • 1 tsp freshly-grated ginger
  • 2 15-ounce cans of petite diced tomatoes
  • 1/2 c light coconut milk
  • salt & freshly ground black pepper, to taste
Combine the garam masala, salt and pepper.  
Toss the chicken with the seasonings so that every piece is evenly coated.
Toss the chicken with the flour and then stir fry in a wok with 1 tbsp of oil until cooked through.  Set the chicken aside on a plate.
Cook the onion in the wok for 2 minutes, and then add in the garlic and ginger and cook for one minute more.
Dump in the tomatoes- you can drain one can if you like want a less soupy mixture.  However, I love a soupy tomato dish.
Add in the coconut milk.
Add in the remaining garam masala
Stir, bring to a boil, lower the heat and stir some more!
Let simmer for 15 minutes and then add in your cooked chicken and allow the chicken to heat through.
Serve on rice.  If you have spinach, serve it with that as well!

Monday, December 20, 2010

Pot roast with sweet potatoes

Pot roast isn't very exciting.  However, it can be scrumptious, comforting, and super EASY.  This one delivered on all fronts. Rating 7/10.

Ingredients
  • 3-4 lb chuck roast
  • PAM
  • 2 sweet potatoes
  • 1 cup of low sodium beef broth
  • 3 ribs of celery
  • 1 yellow onion
  • 1/4 tsp cinnamon
  • 1/4 tsp pepper
Prepare your veggies by cutting each sweet potato into four pieces.  Dice onions and celery.  Place veggies in crock pot.
Spray a frying pan with PAM and brown the roast on each side.
Place roast on top of veggies.
Combine the beef broth, cinnamon, and pepper and pour into the crock pot.
Cook on low for 10 hours or on high for 4-5 hours.

Vanilla poached pears

I went grocery shopping today sans Al.  This gave me more time in the produce section, since it is usually so crammed that he quickly gets antsy to get going to the beef jerky section.  Anyway, I ended up staring at some bosc pears for quite some while.  I picked a couple up and then contemplated what the heck I was going to do with them for the rest of my shopping spree- and obviously came to the conclusion that they would be scarfed down in a dessert form.  This recipe is pretty good, but I can't say that I'll make it again.  Why?  It used up all of my vanilla (which is definitely not cheap), I JUST bought some and I already need to run to the store to buy more!  I'll probably just wait to eat these again until pears have been genetically modified to taste like vanilla. Rating 6/10.


Ingredients

  • 2-4 bosc pears
  • 4 cups of water
  • 3 tbsp vanilla extract
  • 2 tbsp honey
  • optional 1/2 cup sugar
Boil the water, vanilla extract, and honey in a saucepan.
Core the pears from the bottom, but don't remove the core all the way to the stem.  Peel the pear (and eat the peelings nom nom).
Slice off enough of the bottom of the pear so that they can stand upright.
Place the pears in the saucepan, cover, and reduce the heat.
Simmer for 15-20 minutes.
Remove the pears and allow them to cool before serving.

Optional sugar striping:
in a frying pan heat up 1/2 cup of white sugar.  Stir constantly until melted through and stripe the pears with it.

Chocolate sauce would also be delicious.

Sunday, December 19, 2010

Dutch baby pancake

With the stress of finals wearing me out, I've barely had a chance to realize that Christmas is less than one week away.  Oh gosh.  Yesterday while we were driving home from seeing The Fighter (good movie btw), it finally hit me that in a week Alex and I will be home in Minnesota for a long string of Christmas-related events.  I have a rather large family on my mom's side, which means a lot of family events (pizza night, cousin night, ladies luncheon, and the grand family finale) and that is just for my mom's side of the family.  All of these events are food-centric. 

  So, this realization of the impending holiday has definitely made me have Christmas grub on the mind.  One of my favorite things to eat is a nice German pancake/panacookin (I have no idea how to spell it) on Christmas morning.  Naturally I smother them with cool whip and strawberries.  I happened to pick up Ellie Krieger's cookbook, So Easy, from the library and there just happened to be a healthy recipe in there for a panacookin (I blame all the plaque on my artery walls on my mother's panacookins).  However, she calls it a Dutch pancake.  Pfft.  ANYWAYS, I decided that I needed to try this out and see if it could compare to the butter-heavy version.  Did it ever!  Had I been a kid I probably would choose the unhealthy version, just because I was a chubby little butter-obsessed porkster for quite a while.  However, this was equally delicious without butter gushing into my mouth while chewing.  AND the whole-wheat flour made each portion much more filling.  I couldn't even eat half of one panacookin, whereas normally I could eat a full one.  One panacookin from this recipe could easy feed 3 adults. Rating 9/10.

Recipe from Ellie Krieger
Adapted by me!

1/2 cup all purpose flour
1/2 cup whole-wheat pastry flour- or regular whole-wheat flour
4 tsp sugar (I used 2.5 tsp of turbinado because Alex drank a whole big gulp sized soda by himself yesterday and I'm afraid any more sugar than necessary may cause him to keel over)
1/2 tsp salt
1 cup 1% milk (I used skim)
2 large eggs
2 large egg whites
grated zest of one lemon (I used a lime since I didn't get a chance to go to the grocery store)
4 tsp butter


Preheat oven to 450 degrees with a pie plate inside.
Combine the flours, sugar, and salt in a medium sized bowl.
Combine the remaining ingredients (except for butter) in another bowl. 
Mix the combined ingredients until just blended.
Remove the pie plate from the oven and melt the butter in it, swirling the butter around until the entire bottom and the lower half of the plate walls have been coated.
Add batter to the pie plate and place in the oven for 23-25 minutes.  DO NOT OPEN YOUR OVEN DOOR TO LOOK AT IT until the very end.
Remove from oven.
Divide and devour.
Good toppings- cinnamon, whipped cream and strawberries, banana slices, apple sauce, peach sauce, pretty much any fruit or regular pancake topping.


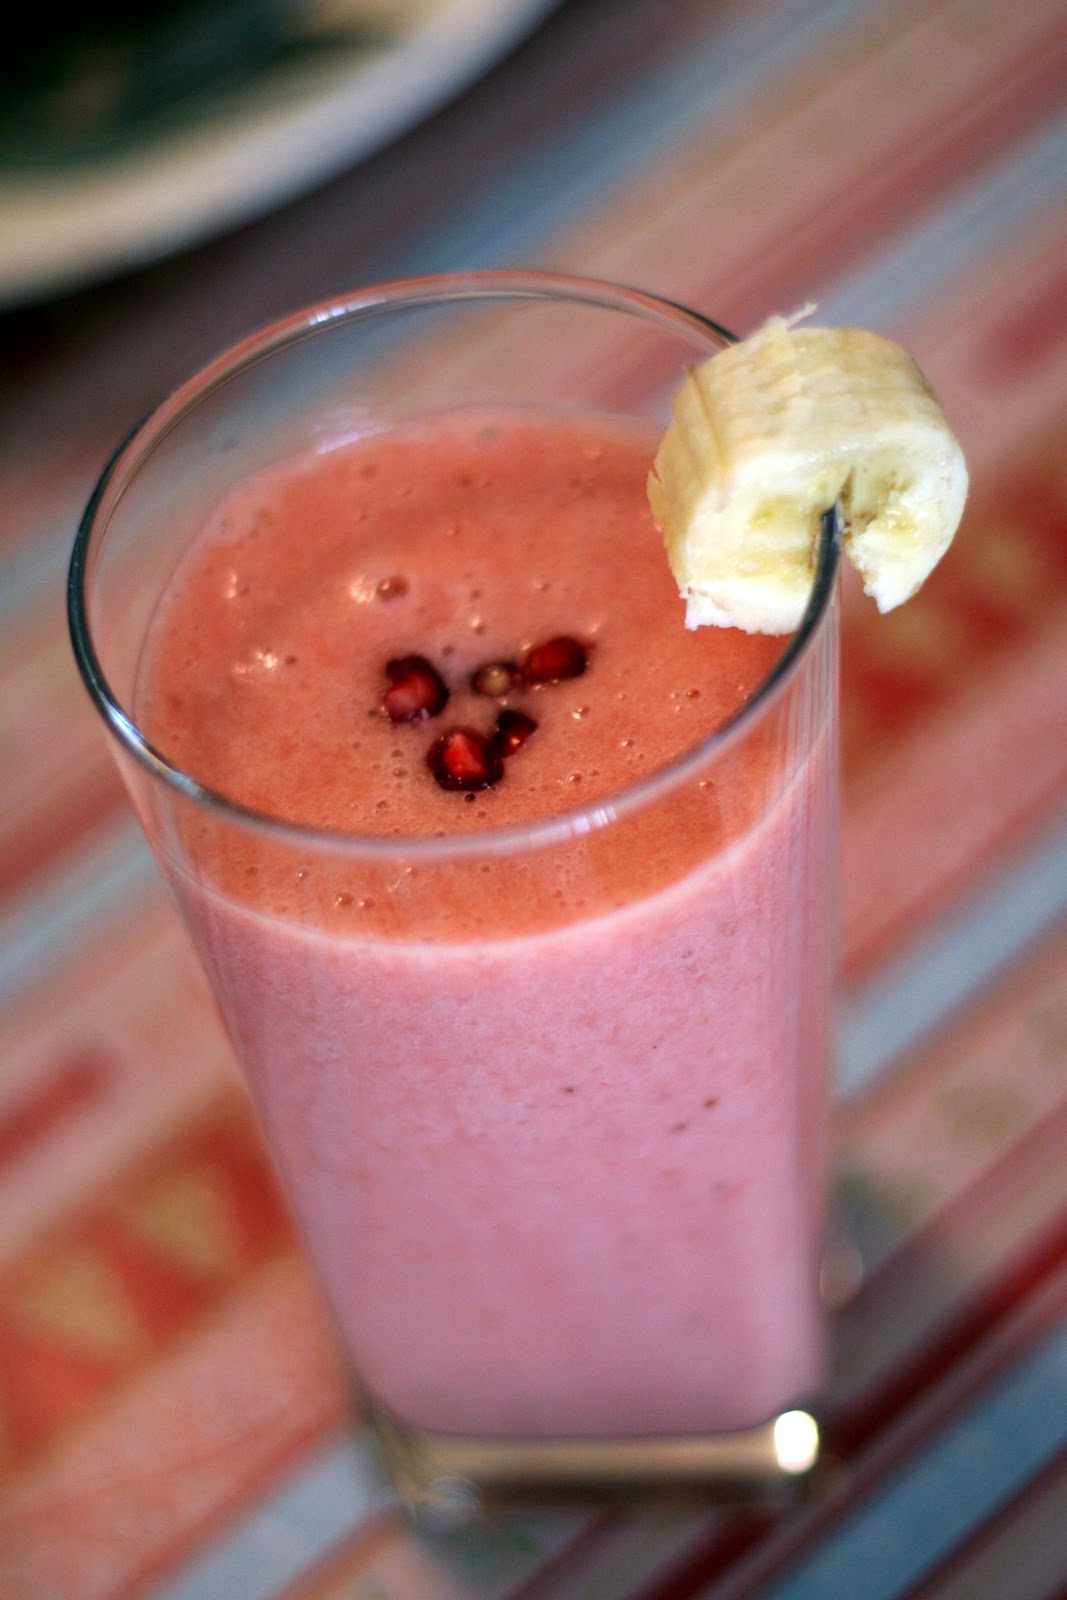
This is the super healthy smoothie that I made to go along with breakfast.  It was healthy, but the grapefruit didn't really play well with the other ingredients as much as I had hoped :(.

2 1/2 bananas
1/2 cup squeezed pomegranate juice- or POM
1 lime
1 tsp sugar
1 grapefruit that was previously peeled and broken into pieces then frozen.
produces 3 cups of smoothie

Blend everything!

Friday, December 17, 2010

Spicy pulled chicken fajitas

Alex and I are huge fajita connoisseurs (for some reason the part of Madison that we live in has like 10 different tex-mex places within five minutes of our place).  I'm pretty sure that out of all of our frequent trips to "Mexican" restaurants, I've only NOT gotten a fajita entree twice.  I'm always looking for new and exciting recipes to make each home-made fajita dinner memorable, and this one definitely was.  Usually I just mash a bunch of spices together and smother the chicken with said spices, but this recipe produced a nice sauce that was obvious and yet not overbearing.  Granted, I didn't make it as spicy as the recipe calls for! Rating 7/10.
Recipe adapted from Healthy Food For Living

1 small onion- finely chopped
1 minced jalapeno pepper- removing seeds is optional
1 large garlic clove- minced (or one tsp of pre-minced garlic if you're lazy like me)
1 can of tomato sauce (8 oz)
1 tbsp of tomato paste (I added in three, just because I hate wasting paste)
3 tbsp apple cider vinegar
2 tbsp molasses
1 tbsp paprika
1 tbsp Worcestershire sauce
1 tsp dry ground mustard
2 tsp ground chipotle chile pepper (I couldn't find any, so I just went with chili powder)
1/4-1/2 tsp cayenne powder
1.5 lbs boneless skinless chicken thighs (you chicken breast fans won't regret this)
Salt and pepper to taste

Drizzle oil in a large pot or dutch oven and add in the onion and jalapeno.  Cook for about 3-5 minutes, and then add in the garlic.
Let the vegetables continue to cook by themselves for 30 seconds, or until the garlic becomes fragrant.
Add in the remaining ingredients (excluding the chicken) and stir the sauce until everything is combined.
Add in the chicken and make sure that each piece has sauce surrounding all sides.  There should be just enough sauce to cover all sides of every chicken thigh.
Cook for an hour, flipping the chicken thighs occasionally. 
Shred the chicken with two forks (if there's a better method out there- use that).
Allow the newly exposed meat to become saturated with the sauce and simmer for about 10 minutes, stirring occasionally.
Eat in a sandwich, a fajita, a burrito, an enchilada, whatever!

Sunday, December 12, 2010

Mini Pumpkin Cheesecakes

I know that pumpkin baking season has been over now for a couple of weeks, but I have not reached my pumpkin limit yet!  It also doesn't help that Alex has been NAGGING me forever to make him pumpkin cheesecake.  Why he didn't think that he could do it himself is beyond me, but I finally broke down and decided to make him his stinking cheesecake.  And I'm glad that I did.  However, I made him help me out :).  I figured that this was a great way to use up all of the pumpkin puree that I aimlessly made, but I ended up using a can of Libby's since it was already at room temperature.  I decided to make the cheesecake into single size servings by baking them in a muffin tin.  Each serving size is approximately 3 tablespoons worth of awesomeness, and one more bite would probably make my stomach explode since they are so filling.  They are SO good that I downed an entire serving right when I took them out of the stove, mmmm hot cheese.  Recipe from Tracey's Culinary Adventures. Rating 9/10.
 Ingredients
  • 2 8-oz packages cream cheese, at room temperature
  • 2/3 cup sugar (I used turbinado)
  • 1 1/2 teaspoons vanilla extract
  • 1/8 teaspoons salt
  • 2 large eggs
  • 1/3 cup pumpkin puree
  • 2 1/4 teaspoons all-purpose flour
  • 1/2 teaspoon ground cinnamon
  • 1/4 teaspoon ground ginger
  • 1/8 teaspoon ground nutmeg
Beat the cream cheese in a stand mixer on a medium setting until it is fluffy, about 4-5 minutes
Combine the sugar, vanilla extract, and salt in a separate bowl and then combine with the cream cheese.
Add in the eggs one at a time.  Do NOT OVER MIX.  Mix until thoroughly combined, and then turn your mixer off!
In a separate bowl combine 2/3 cup of the cream cheese batter with the pumpkin, flour, and spices.
Preheat oven to 300 degrees.
Line a muffin tin with paper liners.  I only needed ten.
Fill each muffin liner with 2 tbsp of regular cream cheese batter.  Add 1 tbsp of pumpkin cream cheese batter on top, and use a knife to make swirls between the layers.
Bake for 17-20 minutes, or until the center of the cheesecake is settled.
Remove from oven and let cool.
Once cooled, place in the fridge and try to resist eating one for up to six hours.  I made it to one hour, not including the hot cheesecake that I slurped down.

I was able to make ten

The Best Bagel

No joke, these are AMAZING.  I baked these last night and just ate one of these for the first time this morning (I was too stuffed from pretzel bites last night to try to consume any more carbs).  The trick is that you need to make these bad boys the day before you bake them, which isn't very fun for those who want instant gratification. I'm planning on freezing the bagels that I don't hand out to friends in class tomorrow.  Rating 10/10
These are from Peter Reinhart.


Ingredients
Set 1
1 tsp instant yeast
 4 c bread flour
2 ½ c warm water

Set 2
1 tsp instant yeast
2 tsp vanilla
1 Tbsp honey
Set 3
3 c bread flour
3 Tbsp sugar (I used turbinado)
2 Tbsp packed light brown sugar
2 ¾ tsp salt (I used less)

Set 4
3/4 cup bread flour

Miscellaneous
1 tbsp baking powder
Cornmeal
Toppings


Start out by mixing set 1 together by hand or with a stand mixer.  The batter should be sticky.  Cover with saran wrap and let rest for 2 hours, or until doubled in size. 


Add set 2 into the bowl and stir.

In a separate bowl mix together set 3 and then combine with everything else that is already in the mixing bowl.  Mix together with a dough hook.  Once the dough has formed a ball, slowly add in the remaining flour from set 4.  If you have ingredients that you want within your bagels  (raisins, sun-dried tomatoes, dried cranberries, chocolate chips), add them in within the last two minutes of mixing.  However, I added in fresh cranberries, and found that they they were so large that they needed to be folded into the dough by hand. 


Knead for 10 minutes by hand.  Divide the dough into 8 separate balls that weigh 3.75 oz each.  Cover with a wet towel and let rest for 20 minutes.


Line a baking sheet with parchment paper and spray it with Pam.  Form each ball into a bagel by poking a hole in the center and stretching it out.  Place the bagels onto the baking sheets and cover with saran wrap and let it rest for 20 minutes more.


The bagels need to be refrigerated, but need to pass the floating test before they can be placed in the fridge overnight.  To do this fill a bowl large enough to fit a bagel with cool water and place one bagel in it.  The bagel should float within 10 seconds.  If it doesn't float, gently dry it with a paper towel and retry the floating test again in 10 to 20 minutes.

Once the bagel passes the floating test, place all of the bagels in the refrigerator.  To be honest, my bagel didn't pass the floating test.  I tried it twice.  My bagels still turned out to be quite worthy.

The next day
Preheat the oven to 500 degrees, if you are using a baking stone place it in the oven during the preheat.  Boil water in a large pot.

Place as many bagels as possible without crowding them in the pot.  Let the bagels boil for one minute, and then flip them over and boil them for one minute more.  With a slotted spoon remove bagels and place them on your cornmeal sprinkled baking surface. You can use a baking stone, a parchment paper lined baking sheet, or a rack.  If you are adding toppings (sesame seeds, poppy seeds, pumpkin seeds, etc.) to your bagel, add them now.

Bake bagels at 500 degrees for 5 minutes.  After the first 5 minutes, rotate the baking surface and bake for 5 minutes more at 450 degrees, or until golden brown.  Remove and let cool.

Saturday, December 11, 2010

White bean soup featuring kale and chorizo

AKA another way to add kale into my diet.  One of the blogs that I poke around featured this recipe from Cooking Light, and I decided that in addition to getting a good dose of kale I wanted to find out what chorizo is (my taste buds are sheltered, gimme a break).  I was pretty surprised at how delicious this is, especially considering the small amount of ingredients that needed to be dumped into my big ol' pot.  I found myself yearning for the kale, chorizo, and beans all at once (so basically every spoonful left me satisfied and yearning for more).  Alex managed to consume an entire bowl within a matter of minutes- and he was using a fork.  So yeah, it's good.  Rating 7/10.

Ingredients
  • 3.5 oz of chorizo- I used mild
  • 1 yellow onion- diced
  • 2-3 cloves of garlic- minced
  • 2 cans of white cannellini beans- drained and rinsed
  • 4 cups of chicken broth
  • 3-4 leaves of kale- chopped or hand-ripped
  • sea salt to taste
  • freshly cracked pepper to taste
  • 1/2 tsp arrowroot powder (optional)
Spray PAM or spread oil on the bottom of a large pot.
Cook the chorizo in the pot over medium hot, making sure to break it up into pieces with a width around that of a dime.
Once the chorizo is cooked through add in the diced onion.  Cook for about three minutes, stirring often.
Add in the garlic and cook for about one minute more.
Add in the chicken broth, beans, salt and pepper. 
Simmer for 30 minutes and then add in the kale.
Add in arrowroot powder in order to thicken up the broth a bit.


Serve with freshly baked bread.  Nuuum.

Monday, December 6, 2010

Cheeseburger PSA

For some reason the most stressful thing for me about making cheeseburgers is when to add the darn cheese!  Usually I add mine about 3/4 of the way through and put a lid over my grill pan (I can't have a legit grill at my apartment).  My NEW and AWESOME way of making the burgers is to put the cheese in it, not on it.  Because of this I needed more hamburger than usual, since there needs to be enough meat to encase the queso.  To assemble the cheeseburgers I make each individual future cheeseburger into two balls of meat (two cheeseburgers= four burger balls).  Flatten each of the burger balls and place your desired cheese (I did the classic American) on a flattened burger.  Place the other burger half on top of the cheese and pinch down around the edges so that the cheese won't ooze out all over when you're cooking it.  Set aside in the fridge for awhile (~10-15 minutes) so allow the cheeseburger to become one.  Grill/pan grill on each side until done!

Sunday, December 5, 2010

Banana Ice Cream

I made a lot of stuff today.  More stuff than usual.  In fact, everything that I consumed was made from scratch.  Does cracking an egg and frying it count as scratch?  It would be more "scratch" if I had raised the chicken myself, but same difference.  I was reflecting on why I made so much, and I think I came up with a possible reason.  My favorite movie ever is the first half of Gone with the Wind.  For those of you who have watched the VHS version of GWTW, you know that at the end of the first tape Scarlett goes all bonkers in the depleted garden and announces that she "will never go hungry again!"  Oh Scarlett.

Anyway, before yesterday my fridge and cupboards were both practically empty.  I didn't even have any milk, which is a huge sin in my milk-guzzling family.  I fixed this yesterday by going to three different grocery stores to obtain all that I desired, and I desired A LOT.  I didn't get to really prepare any food post-shopping trip since I had to get all fancified for a holiday party... SOOO today I was constantly in the kitchen, and I think that preparing food was my mechanism to deal with the stress of previously having nothing to eat.  At least I haven't started hoarding hamburger hot dish kits like my mom.  Rating 9/10 (it's pretty darn good).


 I feel like bananas are one of those things that you put in a smoothie as a filler since berries are so expensive.  It never occurred to me that a smoothie should consist of only bananas, until yesterday when I was grocery shopping.  The result of my endeavors was much more ice creamish than smoothieish, which works for me!  This "ice cream" is so simple and delicious that I will consistently be making this in the future whenever I want something sweet but healthy.  Seriously, all that you really need is one ingredient.

Ingredient
Very ripe bananas- or however you prefer them.  I like the extra sweetness of the very ripe banana.

Optional ingredients
cream
milk
whipped cream
vanilla extract
cinnamon
orange juice
Chocolate pudding (Al's contribution)

Place chopped up bananas in a freezer bag.  I literally put my bananas in the bag whole and chopped them up with a butter knife in there.  Only one thing to wash! (with this step anyway).
Forget about the bananas for several hours- they need to become significantly hardened.
Dump an appropriate amount of banana slices into a blender or food processor.  Add in any optional ingredients.  I added about 1/4 tsp of vanilla extract to the equivalent of 1 chopped banana.
Blend until all chunks have been transformed into this simple yet drool-worthy treat.
I topped mine with whipped cream, even though it didn't need it.

7 Grain Bread

I've really been wanting mozzarella cheese sticks lately.  So much so that I bought a huge bag of mozzarella sticks yesterday.  However, I was a little aloof and forgot to buy the bread crumbs.  This morning I was distraught when I realized my grocery shopping fail, and to my dismay the little shop across the street is closed on Sundays.  They probably would have charged $10 for a regular sized container, so maybe it wasn't such a bad thing that I couldn't get pre-made bread crumbs.  I wasn't in the mood to walk 20 minutes to go to the grocery store, so I decided to invest way more than 20 minutes into making my own bread for the cheese sticks, which I will hopefully be consuming later on tonight.  Anyway, I whipped open my copy of Healthy Breads in Five Minutes a Day, and I instantly started paging through looking for the 10 grain bread recipe that I have had my eye on.  Why did I make this bread with 7 grain then?  Because 7 grain was on sale one million weeks ago when I went shopping, whereas 10 grain was not.  Anyway, I'm not sure how this bread will be as a cheese stick breading, but it is pretty tasty just as bread.  Num!  Rating 7/10.


I halved the original recipe, so you can double the ingredients below if you go through a lot of bread.

  • 1 cup of 7 grain hot cereal (or 10 grain, if you want to really get a great variety of grains)
  • 1 1/2 cuips of white whole wheat flour
  • 1 cup unbleached all purpose flour
  • 2 1/4 tsp yeast (or one packet)
  • 1 tsp kosher salt
  • 1/8 cup vital wheat gluten
  • 1 3/4 cup lukewarm water
Combine all of the dry ingredients in a mixing bowl.
Add in water slowly until all of the water has been incorporated into the dough.
Cover the bowl (not airtight) and let it rest for two hours.  It can then be transferred to the fridge, if you want to use it on another day.

Assuming that you are baking it now:
Cut off 1 lb of dough from the dough wad (this should be roughly half of the dough, or 1/4 of the dough if you doubled the recipe).
Sprinkle with flour and form into a ball by tucking the dough under the ball and turning the dough as you go.
Stretch it out into an oval and place it on a clean surface/pizza peel/cutting board and cover loosely with saran wrap.  If you didn't refrigerate the dough then let it rest for 40 minutes.  If it has been refrigerated let it rest for 90 minutes.
Preheat the oven to 450 degrees for 30 minutes with a baking stone and broiler pan inside the oven.
Apply water to the top of the loaf and coat with seeds.  I just used sesame.  Make 1/4 inch deep diagonal slashes across the top with a knife.
Place the loaf onto the baking stone and add 1 cup of hot water into the broiler pan.  Shut the door immediately so that the steam doesn't escape.
Bake for 30 minutes and try to wait for it to cool before you consume a sizable chunk.

Update- this would make great bread crumbs for anything that does not need to actually be breaded.  I had a crazy time trying to get the crumbs to stick to my cheese sticks, so I'll probably just use this recipe for crumbs for things like macaroni and whatnot.   However, this bread is DELICIOUS and oh so crunchy.  I'll be making this often.

Tuesday, November 30, 2010

Lentil Soup

Considering the simplicity of the ingredients and actual cooking, I found this to be a worthwhile meal.  However, Alex did not seem too pleased since there is no meat in this dish.  Tough luck!  In the future if he wants meat when I'm making a veggie meal, he can take care of it himself!  Rating 6.75/10.

I got this recipe from Zoom Yummy


Ingredients
  • 1 cup of red lentils (Bob's Red Mill brand makes them- in case you are having trouble finding them)
  • 1 onion
  • 2 cloves of garlic
  • 1 (or more) large tomatoes
  • 1 chili pepper
  • 3.5 cups of water
  • 1.5 tbsp olive oil
  • .5 tsp mustard seeds
  • 1 tsp garam masala
  • 1/4 tsp turmeric
  • 3/4 tsp cumin seeds (I accidentally used ground cumin- it was fine)
  • salt to taste
  • lemon juice to taste (I used the juice from about half a lemon)


Chop up the onion, tomato, garlic, and chili pepper (leave the chili seeds in if you want some heat).
 
Cook the lentils in a pot with the 3 1/2 cups of water.  This shouldn't take too long (~6 minutes).

Heat up the olive oil in a large pan.  Add in the mustard seeds- they are going to pop!  Once they have commenced the popping then add the onion, turmeric and cumin.  After a minute or two, add in the chopped garlic.  Continuously stir!  Then add in the chopped tomato and chopped chili pepper.
 Then pour the lentils and their water into the pan.  Add in garam masala and salt (I added 1 tsp of sea salt).  Stir and let simmer for a few minutes to allow the flavors to get married. I squeezed my lemon into the soup a few minutes before serving, and boy howdy was it the perfect addition! 

Alex and I ate this just by itself, but it would be great with a side of fresh veggies.  Alex thinks that curry chicken would be great with it, so I'll probably whip this soup up when I finally get around to making that.

Pumpkin Pancakes

I managed to treat myself to these awesome pancakes from Martha Stewart this morning before I headed off to school.  It didn't use up nearly enough of my leftover pumpkin puree to make these, but at least a little bit more is gone now!  But anyway, these pancakes are fluffy, moist and ridiculously nummy!  This recipe makes enough for about four standard sized pancakes, and could feed two normal people.  Alex could eat four all by himself!  Rating 8/10.


Ingredients
  • 1 1/4 cups of flour
  • 2 tsp of baking powder
  • 1/2 tsp ground cinnamon
  • 1/2 tsp ground ginger
  • 1/4 tsp salt (you can add more)
  • 1/8 tsp ground nutmeg
  • pinch of ground cloves
  • 1 cup of milk
  • 1 egg
  • 1/4 cup of pumpkin puree + 2 tablespoons
  • 2 1/2 tsp olive oil
Combine the dry ingredients and wet ingredients in separate bowls and mix thoroughly.  Combine the wet and dry mixtures and mix until well-blended.  Cook in a PAM-ed (or buttered) pan for about 2.5 minutes over medium heat on each side, or until the edges of the pancake are done and the top starts to look a little "settled". 

Serve with maple syrup, cranberry sauce, anything!

Saturday, November 27, 2010

Pork Sandwiches

Or as my friend Sarah would call them, "BBQ sandwiches".  Many fights have been fought over what constitutes as BBQ, but I'm pretty sure that you need to be more specific when you say "we're eating BBQ".  Anyway, this meal was pretty easy.  I managed to prep everything and throw it in the slow cooker in about 30 minutes, and that counts the two times that I ran to the store across the street to get something.  I put Alex in charge of making the buns (since I had to go to work and couldn't clone myself quickly enough to bake a batch), and even though he was a little apprehensive about being in charge of something beyond stir-fry, the buns turned out great.  I ate a whole bun by itself before dinner.  And the meat smelled so amazingly-awesome that I started forking off pieces and dunking them in BBQ sauce while I waited for my fries to hurry up.  Rating 8.5/10.
This recipe is from Life's Ambrosia

Ingredients
  • 1 teaspoon chili powder
  • 1 teaspoon cumin
  • 1 teaspoon granulated garlic
  • 1/2 teaspoon fresh cracked black pepper
  • 1/2 teaspoon dried oregano
  • 1 (5 pound) bone-in pork shoulder
  • 1 medium onion
  • 3 cups beef broth
  • 2 cups water
Procedure
Combine all of the spices and rub the pork down.
Let the pork rest a bit- preferably overnight.
Chop up the onion and lay it on the bottom of the slow cooker.
Place the meat on top of the onions and fill the slow cooker with the beef broth and water.
Cook on low for 8 hours.
Scoop the meat up with a slotted spoon and encourage the meat to fall apart by pulling at it with two forks.  This step should be a breeze.
Eat the meat in a sandwich, burrito, fajita, enchilada, paleo-friendly romaine lettuce leaf, whatever works.

Pumpkin Pie

 Note- to make this recipe PALEO- omit the crust.

I had A LOT of pumpkin puree left over from my cornbread, and I promised Alex that I would make him a pie with it.  I almost changed my mind about making this pie after Alex ate FIVE slices of pie yesterday, but I wanted to make some for myself.  I chose to make this particular recipe because 1) it doesn't require making a legit pie crust and 2) the filling is "paleo" friendly (which means that it contains stuff that only paleolithic people ate- Alex is a fan of this approach to eating). 
I was pretty surprised by this recipe (mainly because it came out actually looking like pumpkin pie).  I was kind of indifferent to the pie after an hour in the fridge, but this morning I couldn't stop myself from going back for a second piece of breakfast pie.  Rating 8/10.


Crust
  • 2 cups ginger snap- I made my own using my recipe below (they may or may not have been fudged)
  • ¼ cup olive oil
  • ¼ cup maple syrup
Filling
  • 1 ½ cups of pumpkin puree
  • 3 eggs
  • 1 cup coconut milk
  • ½ cup honey
  • 1 tablespoon arrowroot starch
  • 1 teaspoon vanilla
  • 1 tablespoon pumpkin pie spice (I used a recipe here to make my own)
  • 1 teaspoon salt

Crust
Crush up the gingersnap cookies and combine with the maple syrup and olive oil.  Press into the bottom of a 9x9 pie plate (2 cups of cookies gave me enough crust to fill in the bottom of the plate, but not the sides).  If you are having problems mooshing the crust into the plate, let the crumbs soak a little bit longer in the olive oil and maple syrup.  
Filling
Combine all of the ingredients for the filling in a pretty large bowl and STIR WELL.  I would have used my stand mixer to do this, but it was dirty.  I probably would have saved a bit of time if I had, since I had issues with my arrowroot starch clumping up. 

Pour the filling into the crust.  Bake for about 50 minutes in an oven that has been preheated to 350 degrees.   Cool in the fridge (I found it best after a night in the fridge) and eat with a mound of whipped cream.


Wednesday, November 24, 2010

Pumpkin Puree

My contribution to the Thanksgiving family feast tomorrow is my pumpkin cornbread.  A few weeks ago  I noticed that none of the grocery stores that I shop at had any pie pumpkins out.  I was horrified!  It was as if all of the pie pumpkins had been bought up by Libby's and processed so that the 2010 pumpkin shortage wouldn't reoccur.  I prematurely decided that I was defeated, and picked up a can of pumpkin.  However, last night I had a hankering for some Neapolitan pizza and didn't have any tomatoes.  I chose to shop at a store that I always forget exists, mainly because they specialize in cheese.   As I walked up to the storefront (I had walked all the way there, assuming that it wouldn't take as long as it did...), I noticed that there was a HUGE CRATE FULL OF PIE PUMPKINS.  I almost died.  I also almost bought 5 so that I could make a ton of puree and freeze it, but then I realized that there was no way that I was going to carry 5 pumpkins + other purchases home in the cold.  So... this Thanksgiving I am thankful that I was able to purchase a legit pumpkin, and not have to feed my family Libbys.'s.  I mean, if I was busy actually doing homework or making more than just my pumpkin cornbread I would probably use canned pumpkin, but I like avoiding doing my term paper way too much to not spend time actually cutting up/gutting/baking/scooping out pumpkin.

Ingredients:
Pie pumpkin!

Procedure:
Preheat oven to 350 degrees.
Cut off the stem and slice the pumpkin in half.

Place pumpkin halves face-down on a cookie sheet covered with tin foil.
Cover the pumpkin halves with tin foil (this helps with evenly cooking the pumpkin since there is a huge gaping hole where the stem used to be (at least the way I cut the pumpkin since I'm too weak to cut off the stem in one go)).
Bake for an hour and a half.
Let the pumpkin cool and then scoop out the seeds.  This step can be done before the pumpkin is baked, but I find it easier to remove the seeds and guts post-baking.  Save the seeds if you like them, but I just throw them away.  Scoop out the pumpkin flesh and mash it to smithereens or use a mixer.  My pumpkin remains stringy because I don't have any fancy equipment to completely puree it, but I kind of like the added texture in my cornbread.  I'm sure once I get a food processor or food mill I will change my mind, but that has to wait until I go home for Christmas I nab my mom's.

Tuesday, November 23, 2010

Gingersnap Cookies


Since Alex and I are planning on moving to China at the end of this summer, I'm really making an effort to use up my spices. It doesn't help that the recipes that I'm using to use up all of these spices call for other spices, so I just end up buying more spices anyway! Tonight I was able to make these cookies without having to buy any extra spices, so I was pretty ecstatic about that. No lie. However, I didn't have any ground cloves. I went all mega-domestic and ground my own. This was accomplished by mashing whole cloves with a teaspoon, then rolling the cloves with a rolling pin, and then repeating the mashing with the teaspoon. I NEED a mortar and pestle. I need a lot of things that I don't have space for though =/. Anyway, cookies aren't usually on my list of things to make. Ever. I don't think that I have baked any sweets since I was scarred in high school. I spent hours and hours baking and decorating a cake for some guy, and he had the nerve to tell me that it wasn't moist enough. However, these cookies really spoke to me (mainly because I have a lot of molasses).  Rating 9/10.

Ingredients
  • 3/4 cup unbleached all purpose flour
  • 1/4 cup whole wheat pastry flour
  • 1/4 cup brown sugar
  • 1/2 tsp ground cloves
  • 1/2 tsp ground cinnamon
  • 1 tsp baking soda
  • pinch of salt
  • 1/2 cup molasses
  • 1/4 cup canola oil
  • 1/2 tsp vanilla extract
  • 1 egg
Procedure
Combine dry ingredients in mixer bowl.
Combine the wet ingredients in a separate bowl.
Combine them both and mix in a mix stand with the paddle attachment.
Cover (a pot lid fits on my kitchenaid stand bowl just fine) and place in the freezer for an hour- or until firm.
Cover a cookie sheet with tin foil.  Spray hands with PAM and shape the dough into sixteen 1 inch balls and place on cookie sheet.
Preheat oven to 350 degrees and bake for 12 minutes- or until done.

Let cool, dunk in milk.

Update:  These may be the best cookies that I have ever had.  Not only do they taste great without butter, but there is really no need for sugar on these bad boys at all.  I think that the small amount of sugar that I did sprinkle on top added some texture, but that is it.  I am having a hard time now scarfing all of them down at once, and I almost started crying when I tucked some into Alex's school bag (because I'm a greedy little gremlin.)

Sunday, November 21, 2010

Noodle Soup

When I was in China I ate noodle soup probably 3-4 times a week.  It took me a while to get used to eating it for breakfast, but it was usually my only breakfast option while we were in Beijing.  During that time all I could think about was how much I missed eating cereal and crumpets, but now I look back on my noodle soup and dumpling breakfasts with fond memories.  Anyway, since coming back to the states I have been eating a lot of pho, since there aren't any great Chinese places around.  I decided to make my own, and I started with beef.  I'm going to try making a chicken version in the future, since I know that my sister will actually eat chicken pho.  I found an inauthentic recipe (I didn't want to buy oxtail or any other exotic ingredients) online at Life's Ambrosia
Considering the simplicity of the ingredients (which essentially made seasoned beef broth with noodles) , it was pretty darn good.  Rating 5.5/10.

Ingredients
  • 4 cups beef broth (this is the average size carton of broth)
  • 1 medium yellow onion, cut in half, one half thinly sliced, leave the other half whole
  • 2 cloves garlic
  • 1 teaspoon whole cloves (making this meal made me realize that I have doubles of A LOT of spices, cloves included)
  • 1 cinnamon stick
  • 1 teaspoon olive oil
  • 1 pound round steak, thinly sliced
  • fresh cracked pepper and kosher salt
  • 1 (8.8) ounce package of thin rice noodles
  • bean sprouts
  • 1 – 2 jalapenos, sliced (I forgot to add this, and it probably would have had that extra kick that I noticed was missing)
  • cilantro, chopped
  • sriracha and hoisin sauce (optional)
Procedure
Put garlic, unsliced onion half, cloves, cinnamon stick and beef broth in a pan and bring to a boil.  Cover and lower to a simmer, and let it cook for an hour.  This is probably one of the best aromas that I have ever smelled.  With about ten minutes left on the timer, start cooking the rice noodles according to the package instructions.  Drain the noodles and combine with the broth.  Allow the noodles to truly become married with the flavor of the broth, which will take about 5-10 minutes, otherwise the noodles will taste a bit bland.  Season with salt and pepper to taste, and top with sliced cooked beef, sliced onion, cilantro, bean sprouts, jalapeno, and sriracha and hoisin sauce.  This recipe makes enough for about 2 people.


Saturday, November 20, 2010

Spicy Roast Beef

I don't like to remake entree recipes often, unless they are really really basic (think tex-mex or stir fry).  I think that if I make them too often (~4 times a year), then I will tire of them.  I have a history of endlessly eating and tiring of food... Smacks cereal, macaroni and cheese, and other foods that I've repressed in order to prevent myself from crying every time I walk past them in the store.  So far I've only been able to regain my will to eat the blueberry cranberry bread from the Breadsmith, a loaf of which I can devour in a sitting.  Good thing I'm never actually in town on the days that it is made, otherwise I would probably have sausage fingers from all of the carbs.  Anyway, moving away from bread... Today I made a roast, the same roast that I made about a month ago!  Alex and I were debating whether or not to go to Outback (which I think we went to like four times in the last two months... yikes!)  I won out, and got to make a roast.  The crushed pepper really added an nontraditional kick to this roast.  It didn't help that I apparently didn't mix the spices well enough, so occasionally there would be bite of very ferocious tasting beef.  We had our friend Sarah come over for dinner, even though the poor girl wasn't fed for like two hours because we didn't get back from the grocery store until much later than anticipated.  Alex really liked the roast, I really liked the roast, and Sarah will be coming back for dinner again.  Rating 9.5/10.

This recipe is  adapted from Food People Want


Ingredients

  • 1.5 lb boneless eye-round roast
  • 1 teaspoon freshly ground black pepper
  • 2 teaspoons dried oregano
  • 2 teaspoons dried basil
  • 1/2 teaspoons ground red pepper
  • 3 cloves of garlic, finely chopped to a paste.  Or 1 tsp garlic paste.
  • Salt
  • Olive oil
Instructions

Rub salt all over the roast the day before (or in my case- two hours before) you plan on baking it for dinner.  Cover and wrap tightly in saran wrap, and place in the fridge.
Prior to baking the roast, preheat the oven to 250 degrees.
Rub olive oil over roast and then mix up the spices with the garlic and repeat the rubdown.
In an olive-oiled pan large enough to hold the roast, brown every side (for about two minutes).
Place the roast on a rack that is on top of a cookie sheet.  Line the sheet with tin foil to avoid any unnecessary dish washing *shudder*.
Bake in the oven for an hour and twenty minutes at 250.  Turn the stove off and leave the roast in for another 25-30 minutes (or until the roast reaches 130-140 degrees).
Slice, consume.

Wednesday, November 17, 2010

Beef Bulgogi

This is one of the first recipes that I ever made, aside from fajitas.  It is from the Great Food Fast (from Martha Stewart's team of kitchen minions) cookbook, which was what Alex bought for me a little less than two years ago when I first expressed an interest in cooking.  I made a few meals out of it and most were delicious, and then I fell back into the routine of eating out at restaurants again.  Naturally there are a few flops in this book (and too many fish recipes, gag), but this is truly one of the most scrumptious recipes that I've prepared, ever. 

Alex wanted to veggie it to smithereens, and so I obliged and added some extra stuff.  In the future I'll probably be leaving out the added veggies, as I feel that the veggies included in the original recipe shouldn't have to compete with carrots and tomatoes to bring out the flavor of the marinade.  Rating 8/10 (when excluding the red ingredients- including them makes it more like 6.5/10).

Ingredients *those listed in red are not included in the original recipe, and should probably not be in this one either.
  • 1 lb rib-eye steak- steak substitutions here really detract from the overall awesomeness of this meal, so if you have the money then spend it!
  • 1/4 cup soy sauce
  • 1 tbsp hot chile sesame oil- if you can't find this then toasted sesame oil with a sprinkle of red pepper flakes will do
  • 2 tbsp dark brown sugar
  • 6 garlic cloves- minced
  • 1 tbsp peeled and finely grated ginger
  • 2 red onions- cut into wedges
  • 1 green bell pepper- remove seeds and ribs and slice into 1/2 inch strips
  • vegetable or canola oil
  • boston lettuce leaves for wraps
  • carrots
  • tomatoes
  • bean sprouts 

Instructions
Start cooking brown rice right away according to the package.  This can take up to 45 minutes!  White rice can be cooked right away and then set aside once it has cooked, or it can be started later in the process.
Throw the meat in the freezer for 20 minutes, this will make slicing it into thin strips easier.

Cut up the green pepper and onion.
Combine the soy sauce, hot chile sesame oil, brown sugar, minced garlic, grated ginger in a bowl.
Pour half of the marinade over the vegetables, reserve the rest for marinating the meat.

Slice the beef across the grain into strips.  Marinate for 10-15 minutes with the remaining marinade.
Once the meat has been marinating for about 10 minutes, cook the vegetables in a wok with about two tsp of oil.
Once cooked, set the vegetables aside and use a paper towel to wipe out the wok


Cook the meat until it has been browned, then return the vegetables to the wok.  At this point I added the bean sprouts, carrot shreds, and tomato wedges to the pan.
Cook for a minute or two to reheat the vegetables.


Serve over rice or in a lettuce leaf. 


Monday, November 15, 2010

Soft whole wheat sandwich bread

Lately my culinary adventures have all been... unpleasant.  Which has put me in a depression that could smother out an emo kid's emotional distress.  I've made "gourmet macaroni", buffalo chicken burgers, and hummus.  All of which have probably made Alex start to question what I put in front of him at the dinner table.  The failures hurt even more because they all required more effort than I'm used to exerting.  My depression remedy?  Bread.  I mainly made this because I just got Healthy Bread in Five Minutes a Day  and wanted to dive in.  I also have a ridiculous amount of flour in my pantry right now, and would prefer to get it down to a manageable amount.  I made a loaf of bread and two burger buns with this recipe, and it is truly nom-nom worthy. 

I cut the recipe in half, so that I could remain sane (the original recipe created a boatload of bread).

Ingredients
  • 2 1/2 cups whole wheat flour
  • 1 1/4 cups unbleached all-purpose flour
  • 3/4 tbsp yeast
  • 1 tsp kosher salt
  • 1/8 cup vital wheat gluten
  • 1 1/4 cups lukewarm water
  • 1/4 cup honey
  • 3 eggs
  • 1/3 cup canola oil
Mix together the dry ingredients in stand mixer.
Mix together the water, honey, eggs, and oil and add it to the dry mixture. 
Cover with saran wrap and let it rest at room temp for 2 hours. 
You can use it right away, or cover it and put it in the fridge.  It can be used over the next 5 days.  If you don't use the dough immediately it will need to rest at room temperature for about 90 minutes after being refrigerated.

Baking instructions
Preheat oven to 350 degrees.  Coat a sticky (vs. non-stick) loaf pan with Pam.  I don't use nonstick cookware or bakeware, because I'm paranoid. 
Coat the dough with flour so that you can form it into a ball.  Once you have achieved the perfect dough ball (ha), stretch it out into an oval that is as long as the loaf pan. 
Sprinkle with oats, sesame seeds, whatever.

Place the bread in the loaf pan and bake for about 50 minutes.  The time required really depends on the size of the pan used.
Remove, cool, chow down.


Hamburger buns
Instructions

From the original dough batch tug off as many bun-sized wads of dough as desired.  Form into a circle (add flour if necessary), and place on a cookie sheet that is lined with parchment paper.  Cover with saran wrap, press down on the buns, and let sit for 40ish minutes.  REMOVE SARAH WRAP (I forgot for a few minutes...), and sprinkle sesame seeds on top.  Bake in an oven preheated to 350 for about 20 minutes. 

Friday, November 12, 2010

Animal Crackers

The other day I stumbled across How Sweet It Is, and proceeded to spend way too much time bookmarking things that I want to make really really soon.  When I saw the animal crackers, I knew that I needed to devour some immediately.  Finding the cookie cutters turned out to be a real big hassle, but I was determined to not pay shipping and handling. I abandoned Alex in Game Stop, and then drove like crazy to every home goodsy store in the area trying to find these silly cutters.  Eventually I encountered them (at Joann Fabric), and almost accidentally walked out of the store without paying because I was so frazzled from the whole ordeal. These are good considering that they are one of the healthier recipes that I found for animal crackers, but I'm still on the hunt for a better one.

Ingredients
  • 1/2 cup oats
  • 1/4 cup all-purpose flour
  • 1/2 cup whole wheat pastry flour
  • 1/4 teaspoon salt
  • 1/4 teaspoon baking soda
  • 1 tablespoon honey
  • 1 teaspoon vanilla extract
  • 1/4 cup butter, softened
  • 4 tablespoons buttermilk (I used 4 tbsp of skim milk mixed with 1/4 tsp vinegar)
  • Natural cane sugar
Grind up the oats, I used my awful and noisy blender.
I then dumped the ground oats into my mixer bowl, and added all of the other dry ingredients.
Once they are all blended together, add in the vanilla extract, honey, butter, and buttermilk separately and blend until that ingredient is fully incorporated into the mixture. 
Cover the mixer bowl and place in the fridge for a while (~30 minutes).
Sprinkle a pastry board with flour and roll out the dough to a relatively thin layer.   Add flour to the top of the dough if it sticks to the rolling pin.
Then stamp, stamp, stamp!  Make as many animals/boats as possible, then peel out the excess dough, roll it out, and make even more animals/boats!  Sprinkle/pound some natural cane sugar into the animals. 
Bake in the oven at 400 degrees for about five minutes.  I used my pizza stone to bake the crackers, even though my stone is broken in half :(.

Consume.

Kale Pesto Pasta

The last 24 hours have been AMAZING.  I got to hang out with the family and eat a bunch of cookies, got a new job (bye bye, deli!), finally got the bread cook book that I ordered 3 weeks ago, and hit up Penzey's Spices and bought some goodies.  Holy wow at Penzey's. I want to completely replace all of my spices with Penzey's, if not for the superior quality but for the cute containers. Moving on...

I looove pesto.  I once had a friend who worked at Noodles &Company that would give me a meal for about one buck.  Needless to say, I ate at Noodles ALL OF THE TIME.  My go-to meal at Noodles has always been the pesto cavatappi, but these days I have tried to diversify what I get.  God forbid I ever get sick of pesto.  Anyway, I decided that I wanted a healthier and home made pesto sauce for some pasta, and this is what I came up with. I originally tried to grind up the kale in a whole bunch of different methods, but in the end I had to use my dying blender.  Serve over spaghetti squash for a paleo-friendly recipe!

Ingredients
  • 8-10 leaves of kale (much cheaper than basil)
  • 1/4 cup extra virgin olive oil
  • feta cheese
  • 2 peeled cloves of garlic
  • salt and pepper, if desired
 Boil some water in a pot that is large enough to boil a whole piece of kale in it and to cook the amount of pasta that you want.  Add in the garlic and let the garlic boil for a few minutes.  Add in the kale piece by piece, and allow to soak for about 14 seconds (or long enough for it to mush down so that it isn't crispy anymore).  Remove the kale with a slotted spoon and place in a blender or food processor.  Once all of the kale has been boiled, add the garlic into the blender as well.  Add about 1/4 cup of the extra virgin olive oil, 1 tablespoon of cheese, and salt and pepper (I didn't add any).  Pulse or blend until everything has been torn to smithereens.  Cook pasta in the pot for recommended amount of time while this is going down.  Drain pasta, toss it in the pesto sauce, and top with more cheese. I ended up adding a lot of cheese throughout the devouring-process, I blame it on living in Wisconsin.

Tuesday, November 9, 2010

Neapolitan Pizza

I adore Neapolitan-style pizza.  My first taste of it was in high school when a Punch Pizza came to town, and practically every time I return home I make a stop there.  As I have gotten more familiar with Madison, I have found several Neapolitan pizzerias around.  For some reason nobody is as bonkers over this pizza as I am, so I don't get many chances to hit up any of these awesome eateries :(.

Luckily I found a new food blog yesterday, and was inspired when I saw that there was a Neapolitan dough recipe.  I quickly started fantasizing about this pizza, and started the prep work when I got home from the store today.  This dough should be made the day before, but I couldn't wait so I only let it sit for about four hours (and it was awesome).  I'm pretty sure that this is the best pizza dough that I have ever made, which has cut my pizza crust quest rather short.  I'm planning on making some whole-wheat modifications, so I can justify eating it every day. 

This recipe makes enough dough for several pizzas.  The exact amount varies on how large you make them, but it can make up to six.

  • 4 1/2 cups bread flour, chilled
  • 1 3/4  teaspoons salt
  • 1 teaspoon  instant yeast
  • 1/4 cup olive oil
  • 1 3/4 cups water, ice cold
  • cornmeal, for the bottom of the pizza
Combine the dry ingredients in mixer with the paddle.  Add in the olive oil and  water, and mix until all of the ingredients are combined.  At this point switch out the paddle for the dough hook, and continue to mix on a medium setting for about 5 minutes.  The dough should not stick to the sides, but still stick to the bottom of the bowl.  Side note- I think that this dough feels so great that I would pet it if I didn't have cats that would appreciate the attention more.

On a tray or cutting board shape the dough so that you can easily cut it up into the desired amount of separate pizzas (I made four).  Shape each chunk of dough into a ball, brush with olive oil, and place each dough ball in its own freezer bag.  I threw two into the freezer for future use, and placed two in the fridge for immediate usage.

Allow the dough to rest in the refrigerator overnight.  Take the dough out two hours before use and allow it to come to room  temperature.  About half an hour before preparing the pizza turn your oven to its highest setting (mine tops out at 500 degrees), and make sure that your pizza stone is placed in the oven.  Shape the dough either by stretching it over your knuckles or with a rolling pin (I used the pin).  Place it on a pizza peel that has a layer of cornmeal already spread out on it, and place the desired toppings on the pizza.  LESS IS MORE.  This is not a chance to make a meat-lovers or garbage pizza, this is a chance to experience the fine flavors of just a few ingredients.  I never ever stray from my basic margherita toppings, because I am a creature of habit.  So this is what I put on my pizza
  • my homemade pizza sauce
  • slices of fresh mozzarella cheese (the good stuff, not the mozzarella that you put on sandwiches or your Americanized pizza)
  • shredded basil
  • another option is to add thin slices of roma tomatoes.  I used all of mine up in the pizza sauce, so I went without

When the pizza is prepared, it makes it much easier if you use a pizza peel to transfer it to the pizza stone.  I do not have a pizza peel, so I did my best with a spatula and spare hand (and semi-failed during the transition).  The pizza stone should be on the middle rack of the oven.  Bake the pizza for about 7-9 minutes, or until the toppings are done and the crust feels substantial. Remove from oven and allow to cool for a minute or two, if you can manage to wait.

The crust isn't very sturdy, so this is definitely a knife and fork kind of pizza!

For those without a stand mixer or pizza stone, check out the link above for instructions on how to prepare this.


Pizza Sauce

I have a couple of jars of pizza sauce sitting in my pantry, but today I wanted to be lazy.  With regards to school that is.  So I decided that I would make my own pizza sauce, and headed to the store after class to pick up some sauce essentials.  I'm not sure if this actually saves any money in the long run, but it is definitely much more satisfying (and time consuming).  Aside from slicing the tomatoes up, it is pretty simple and I can't believe that it never occurred to me to make this before.  I went with a recipe from Dawn's Recipes, and tripled it since I bought quite a bit of tomatoes.  I modified the amount used of some of the ingredients, just to make it a little bit healthier.

Ingredients

  • 3 cups of crushed tomatoes (I made my own)
  • 2 tbsp olive oil
  • 1 1/2 tsp garlic, or 3 cloves chopped
    1/3 tsp dried oregano, or 1 tsp fresh chopped oregano
  • 2 pinches of sugar
  • 1 pinch of dried basil
  • 1/4 tsp sea salt

Combine everything together in a saucepan and simmer until the sauce thickens up a bit.  Taste, and add more/different spices if preferred.  I'm planning on eating my sauce all up within the next two days, so I didn't actually go through the canning process, but I'm storing the sauce in jars anyway!